I’ve been trying to get my slides onto a screen properly for nearly thirty years, and I’m only now getting close to satisfied.
That’s not hyperbole. The effort started somewhere around 1997 or 1998, when Todd Clark over at Trainorders.com was doing some slide scanning as a service. I mailed him a batch of slides — actual physical mail, actual slides — and he scanned them and made the files available for download. In the late nineties this felt genuinely exciting, the first time I’d ever seen those Kodachrome frames on a monitor. The quality was what it was, but just having them in digital form seemed like a breakthrough at the time.
It was a start.
The Scanner Era
Around 2000, I got a Minolta Dimage Scan Dual II, which could handle five frames at a time in a strip carrier. For a dedicated slide scanner of that era, the image quality was decent — provided the slides were perfectly positioned and perfectly exposed, which was not always how I had shot them as a teenager. The workflow was also painfully slow in a way that’s hard to remember accurately now; five frames in the scanner, wait, check, repeat, for however many hours it took to work through a box of slides. I got through a bit of my collection this way, but I never got through all of it.
My wife got me an Epson Scan V700 around 2009, which was a meaningful upgrade. The V700 was a flatbed with a backlit film scanning attachment, and it could handle twenty slides at once in the provided holders — a genuine step up in throughput. The image quality was better, the scanning area was larger, and it handled negatives and other film formats too, which made it useful beyond just the Kodachrome. But the same limitation applied: exposure still had to be right in the original frame, and anything that was underexposed in 1991 was still underexposed when you scanned it in 2010.
In 2012 I bought a Pacific Image 5000, which was a genuine step up in capacity — a circular tray that could hold 100 slides at a time, automated transport, and fairly high resolution output for a consumer-grade dedicated scanner. I managed to scan most of what I considered the good ones out of my collection: frames that looked sharp when held up to the light, properly exposed, worth the time. Anything that looked dark or soft I skipped. The quality of what came out the other end was the best I’d gotten to that point, at least in terms of resolution.
But the same problems persisted. The selections I was making — keep this one, skip that one — were based entirely on how the slides looked on a light table with my eyes, which is not the same thing as what information is actually in the emulsion. And I was still fighting the same color temperature issues.
There was also a color problem that ran through all of these early attempts that I couldn’t quite solve. Flatbeds and dedicated film scanners of that era used cool fluorescent light sources for their illumination — fine for documents, not ideal for Kodachrome. When you see a Kodachrome slide on a proper projector, the incandescent lamp throws a warm light through the film, and the color rendering is exactly what Ektachrome and Kodachrome were designed for. That warmth doesn’t come through from a fluorescent backlight the same way. I could adjust color temperature in post, and I did, but there was always something a little off about the results. Anyone who’s sat in a dark room watching Kodachrome slides on a proper projector knows the look I mean — that rich, slightly warm rendering that makes the colors feel saturated and dimensional. Getting that onto a monitor consistently proved harder than I expected.
The Mirrorless Approach
I kept seeing threads on social media over the past year or two about photographers using modern mirrorless cameras to digitize film, with macro lenses and dedicated slide copy adapters. The basic idea is simple: rather than a scanner’s fluorescent lamp, you use a daylight-balanced LED light source behind the slide and photograph it with a high-resolution camera and a macro lens, then you’re working with a RAW file to make adjustments from there. The resolution ceiling of a modern 24 or 40+ megapixel sensor significantly exceeds what consumer flatbeds could deliver, and the workflow is faster once you’re set up.
Years ago, I tried a version of this by photographing projected slides with a Canon DSLR. I projected onto a traditional slide screen using my Minolta slide projector, and then took a photo with the DLSR of the projected image. While the color quality was spot on, there was a huge loss of resolution and I’m sure some mathematical issues with the perspective. I gave up after a few shots.
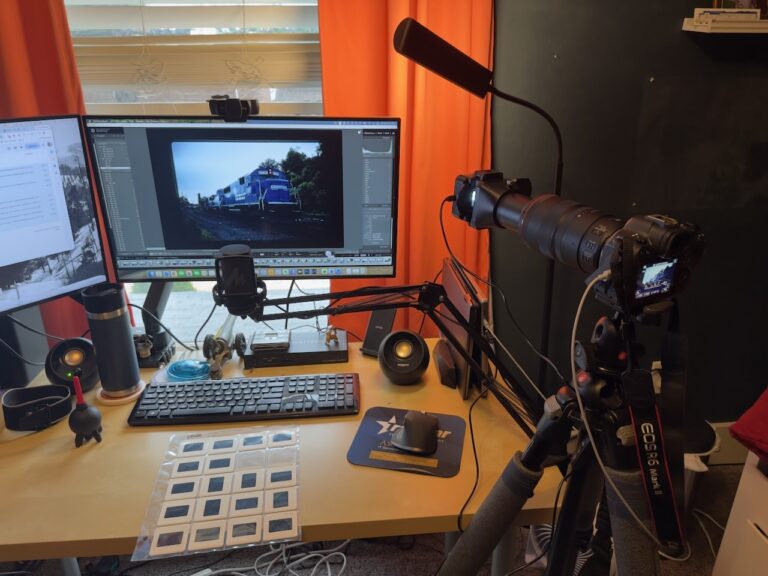
So, back to “today”: I rented a Canon R6 Mark II through LensRentals and paired it with a 100mm f/2.8 Macro lens. For the slide adapter, I picked up a Vello NSD-35, which is a purpose-built attachment that holds 35mm slides in front of the lens at the correct focus distance. I shot tethered to my MacBook Pro, which meant I could see each frame on a large monitor in real time — genuinely useful for verifying that I was focused precisely on the film grain rather than the mount, which is the thing that will ruin an otherwise good copy if you’re not careful.
I also used this project as a reason to finally get serious about Lightroom. I’d been using Bridge for years as my primary image management tool, which works fine but doesn’t give you a lot of creative headroom. Lightroom’s tethered capture, its develop module, and particularly its merge capabilities were all things I’d been meaning to learn. This turned out to be good timing.

The HDR Breakthrough
The thing that changed everything was bracketing.
With a traditional slide scanner, you get one exposure per frame, and whatever the scanner captures is what you have to work with. Underexposed frames stay underexposed. Deep shadows in an original slide either have detail or they don’t. There’s no recovery pass.
With the mirrorless approach, you can bracket — shoot the same slide at multiple exposure settings, just like you would for a high-contrast scene in the field. I was shooting each slide at three or more exposures, then using Lightroom’s auto-merge-to-HDR function to combine them into a single DNG file. Lightroom’s HDR merge is straightforward: select the bracketed exposures, invoke the merge, and it produces a high-dynamic-range digital negative that contains information from all of the source frames.
The results honestly surprised me. Slides that I had written off — frames that looked underexposed and borderline useless when I held them up to the light, or that had scanned poorly on the V700 — came back with real detail in the shadows, proper color in the highlights, and enough resolution to make worthwhile prints or enlargements.
That realization led me to change my approach entirely. With the Pacific Image and every scanner before it, I had been curating as I went — making judgments about which slides were worth scanning based on how they looked on a light table. I decided this time to scan every single slide in my first binder, covering 1991 through 1993, without prejudging anything. Frames I remembered as underexposed, frames that looked soft, frames I would have passed over without a second look using the old workflow — all of them went through the bracket-and-merge process. Almost every one of them came back usable. Some of them came back genuinely good. The HDR merge was pulling detail out of shadow areas that I didn’t know existed in the original emulsion, and the color rendering from the LED light source was holding up in a way the fluorescent-lit scanners never had.
I scanned around 250 slides over the course of a leisurely weekend. The workflow settled into a rhythm quickly: load a slide, shoot the bracket, advance to the next one, merge in Lightroom in batches. The tethered setup and the large monitor made the focus verification step much faster than I expected — when you can see the frame at near-full-screen on a laptop, it’s easy to tell immediately whether you’re on the film plane or not.
Sharing some Slides
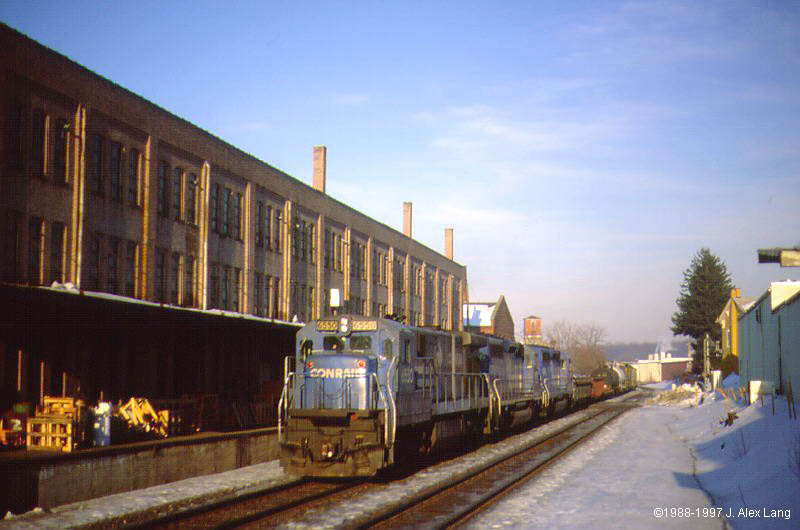
The motivation for all of this was getting some of my archived content out in the open, especially among my “Conrail” friends. For example – Slide roll S09 from June 26, 1993 — a day spent chasing Conrail traffic in the Allentown area with my friend Rich Henning — had been scanned before, badly, or not scanned at all. The HDR approach brought those frames back in a way that the earlier scans hadn’t.
I’ve posted a companion piece on the blog that goes through that day chronologically — seventeen trains in about eight hours, including a Soo Line SD40-2 in white scheme on a D&H freight and a pair of ex-Pacific Rail Lines SD40-2 rebuilds at CP-Burn. If you want to see what this scanning workflow actually produces, that post has more examples.
The short version is that I’m now significantly more optimistic about the rest of my slide archive than I’ve been in a while. I’ve got 14 more binders to scan, containing a ton of slides that I’ve never scanned, or scanned once and set aside. The HDR mirrorless approach changes the calculus on what’s worth going back to. Now, just to find the time to do it…
