
Christmas music is playing softly, I’m sipping a beer, and the kids are asleep (well, the baby is resisting, but she’ll be asleep soon enough…) so I will take a moment to update on things on the Aspinwall Belt. We had a great operating session in late September, with a group of newer folks. We ran with conductor/engineer pairs and ran at a 2:1 fast clock in order to keep things fun – it’s worth spending extra time with the new operators, as they benefit from learning some of the knowledge that I take for granted – let’s face it, normal people don’t know all of the esoteric Conrail stuff that some of us do!
We “only” ran through half of the scheduled trains that evening, so an upcoming session will be held to run the rest of them, again at a slower pace to help everyone “catch on” and provide more time for conversation.
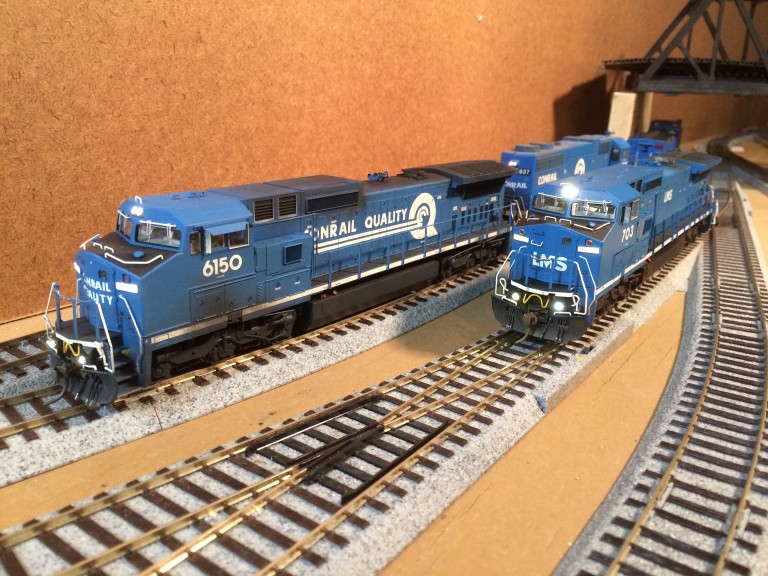
Regular readers will know that my Conrail modeling is constantly inspired by Dave Abeles’s excellent Onondaga Cutoff – and this blog post is no exception. Running trains at Dave’s layout got me inspired to start upgrading my locomotives with sound decoders, and he also steered me to the eBay listing for the Conrail 6150 featured in this post.

In September, I bought the CR 6150, and installed a SoundTraxx AT-1000 “GE FLD-16 Modern” decoder, along with a 30mm 8-ohm speaker designed to fit inside the Atlas speaker mount. Thinking this was a quick project, I did a bit of weathering, and put it back together, and found a couple problems: First, one of the trucks’ wiring disconnected; next, the factory lighting was blue-ish and dim. This was No Good.
So, back we went, sanding and soldering the electrical feeders from the trucks, and installing upgraded LED lighting. The Atlas units have LED’s in all the right places (unless I really wanted independent numberboard lighting), and so I dropped Miniatronics 3mm Yelo-Glo LED’s in place of the factory; and for the ditchlights I used Micro Krystal Kleer to glue in a pair of Richmond Controls surface mount LED’s, and I soldered those to the existing PC board pads Atlas provides to power the ditch lights.
A couple notes about that – the magnet wire on the Richmond Controls lights is insulated by a plastic “dip” – I use a lighter to burn it off and then a bit of sanding to polish. Don’t get too close with the lighter, otherwise you’ll melt the wire, too! Also, the soldering iron will melt the plastic around the shell (when soldering the feeders to the copper “tabs”) – watch yourself, and use a drop of CA to secure the tab when done.
The speaker is caulked in with clear silicone caulk – a good seal helps the acoustics of the speaker enclosure.
The 6150 would have been pretty new in 1994, so I went with heavy weathering on the roof but minimal along the sides of the unit.

The 6150 was a hit at the September operating session, and so I decided to go ahead and do the 703 during October. LMS 703 was built new by GE in the spring of 1994, for a joint Conrail-GE venture called “Locomotive Management Services” – and it needed to look factory fresh. This was a used unit I picked up from a buddy a couple years ago. A few interesting details make this a bit different – the nose grab irons are in 4 pieces instead of 2, so I fabricated new ones out of brass wire. Also, for some reason, online photos show the 703 as having a rather tall turbo stack. So I replaced the Atlas part with a Hi-Tech Details Dash 8 stack, which I shimmed up a bit with scrap styrene.
Most of the wiring was done fairly quickly, but one of the LED’s failed (cold solder joint, perhaps) so that was annoying; but this unit also had a broken handrail assembly on the conductors side – so I ordered a new one, then found after finding the time to work on it that it was the wrong part. More waiting, for the correct replacement part, but a big kudos to Atlas for making good on this, by the way – they included some other small parts that I needed as well!
As far as weathering – I tried something new (for me) – I applied Testors Glosscote to the blue paint, and Dullcote to the black. This required a lot of masking, more than I’d typically do for an engine I’m not even painting. I used PanPastels and some enamel paint for the weathering – my typical weathering routine is to use thinned black for the grilles, then apply Pastels going from light to dark, then to clear coat and repeat if needed.
On this unit, I brush-weathered the turbo stack to make it look pretty burned up (they don’t call these GE’s “toasters” for nothing) and was a bit lighter on the exhaust. I applied a light spray of dullcoat on the top of the unit to protect the pastels. The look of the anti-reflective black nose works pretty well compared to glossy Conrail blue.
The one change I haven’t made to these units (haven’t quite figured out how) is that Atlas uses the wrong font on the numberboards. A minor detail, to be sure, but I have a couple sheets of the correct on Microscale’s various Conrail decal sets. But the Atlas numberboards are a bit short to fit the decals (or perhaps the decals are a bit tall). As I really like making these units look as close to prototype as possible, this detail is going to bug me. (Less so are the Atlas oversize windshield wipers. $10 a pop for wipers means these will be be good enough for quite some time.)
So, while I didn’t get the 703 finished until the end of November, I now have a pair of Conrail GE’s that I’m happy with – and they gurgle away on the ready track both fully-sound-equipped. My 3rd Atlas GE, 6061, is on the shop shelf awaiting this treatment sometime in 2016. In the meantime, I have a few other items on the workbench that I’ll be sharing in the coming months!
